
How to Create a 3D Virtual Tour
Create an interactive 3D space from room photos, a walkthrough, or guided phone capture. Check a preview, then publish a final-quality tour.

Create an interactive 3D space from photos of the same room, a short walkthrough video, or a guided phone capture. Start with a preview to check coverage, then create a final-quality result for sharing.
1. Open 3D and choose a source
Open your project in Studio and click 3D on the left. Choose the source that matches what you have:
| Source | What you need |
|---|---|
| Use existing photos | 2–8 project photos showing the same space from different angles |
| Upload walkthrough | One continuous room video: MP4, MOV, or WebM, up to 30 seconds and 100 MB |
| Guided phone capture (beta) | A phone at the property to follow the room-by-room capture prompts |
Use clear, consistent views of one space. A selection of unrelated rooms may work for a listing video, but it does not provide coherent coverage for a 3D reconstruction.
2. Add your source material
Follow the instructions for your chosen source; you only need one of these paths.
Use existing photos
Select 2–8 photos in the main area. Choose different angles of the same room, with matching aspect ratios. The right panel shows the selected count.
Original and edited versions appear separately. Choose one consistent version of each view—an original and its enhanced copy do not provide two different angles. Avoid mixing empty-room photos with staged versions that change the furniture layout.
If you see a mixed-aspect-ratio warning, replace the mismatched photos before generating.
Upload a walkthrough
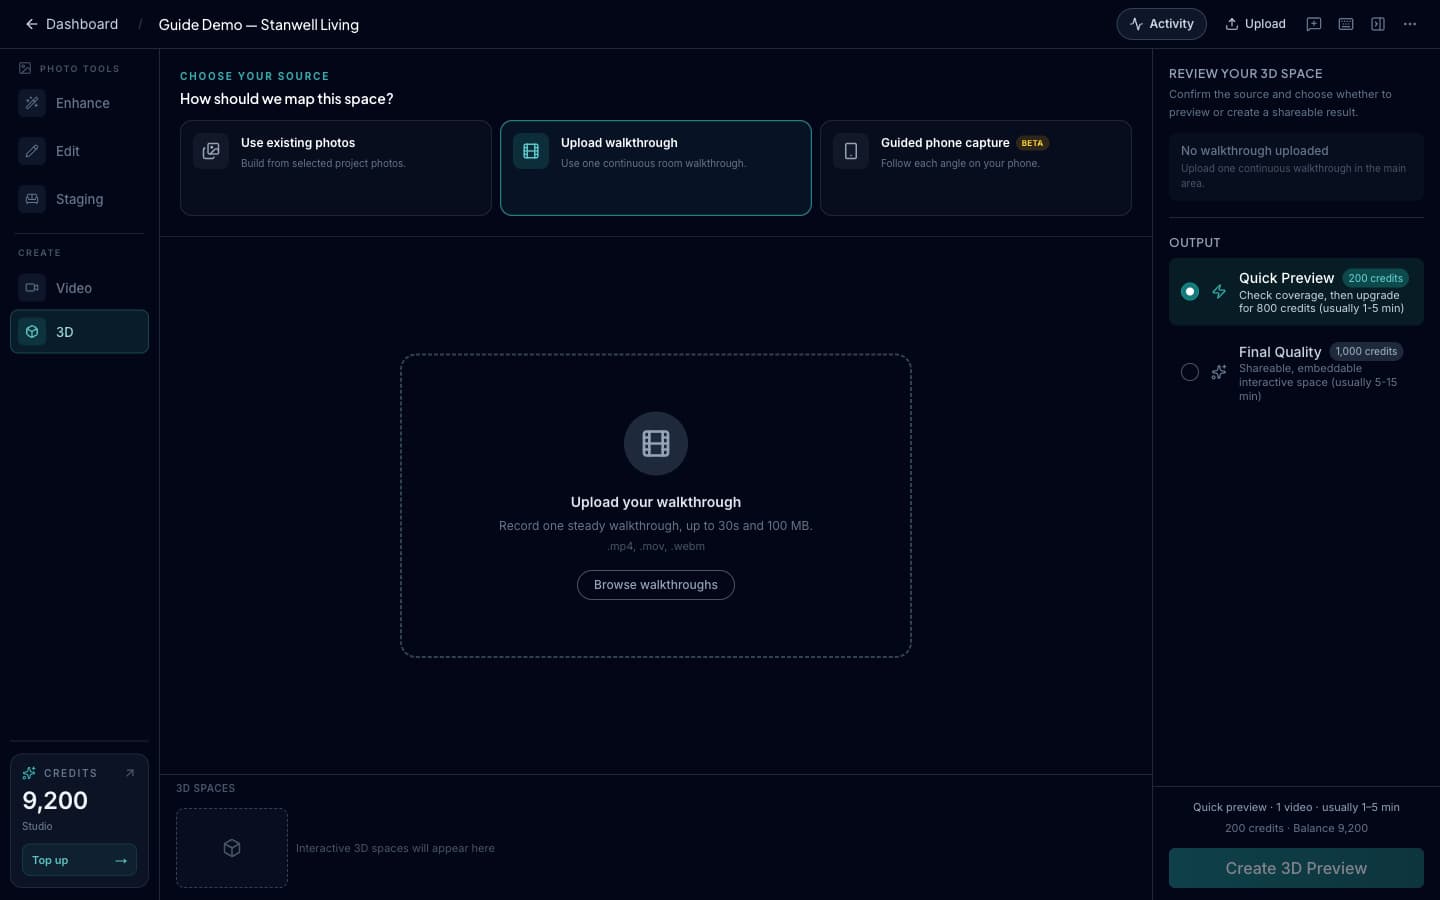
Choose Upload walkthrough, then click Browse walkthroughs or drop a video onto the upload area. Wait until the upload is ready before generating.
Use a slow, steady recording with continuous movement. Avoid fast turns, cuts between rooms, and spending most of the clip facing a mirror.
Use guided phone capture
Choose Guided phone capture, then:
- Click Start guided capture and Create capture link.
- Scan the private QR code with your phone and open the link.
- Name the room and follow the prompts for six views. Keep the phone steady and complete the uploads.
- Return to Studio and select the completed room for your 3D source.
The captured photos arrive in the project automatically. Capture each room as its own set rather than combining several rooms into one.
3. Choose quality and generate
In the right panel, choose:
- Quick Preview — 200 credits. Check the space's coverage first. The interface estimates 1–5 minutes. A completed preview can be upgraded for another 800 credits.
- Final Quality — 1,000 credits. Create a shareable, embeddable space directly. The interface estimates 5–15 minutes.
These are estimates, not guaranteed completion times. Check the source summary and credit total, then click Create 3D Preview or Create Final 3D Space. Open Activity to follow progress.
4. Review the space and share the final result
When generation finishes, select the result in the 3D Spaces strip. Explore the space and check walls, openings, furniture, and areas that were poorly covered by the source material.
For a preview you want to keep, use Upgrade to High Quality to create the final version. If coverage is missing or the layout is distorted, improve the source material before generating again.
For a completed final-quality space, click Share & embed above the viewer, then Publish tour. You can copy a shareable link or website embed code. Anyone with the link can view the published tour; disabling sharing revokes access, including on sites where it is embedded.
FAQ
Why is the create button disabled?
Check the source summary in the right panel. Photo mode needs at least two selected images; walkthrough mode needs a finished upload; guided capture needs a completed, selected room.
Is a 3D tour the same as a listing video?
No. A 3D tour is an interactive space the viewer explores. A listing video plays a fixed sequence of clips and is a better fit when you want to show several different rooms in one video.
Related resources
Try the workflow in PropertyPixel
Create a project, upload your listing photos, and turn them into polished photos, videos, and 3D tours from one Studio.